Back to TheWorxHub for Senior Living Main Menu
Setting Up Checkpoints
Checkpoints are unique to the Security app. A Checkpoint is a Location that can be included in a Security Round. This may mean turning existing Locations into Security Checkpoints, or it may mean adding new Locations for the purpose of including it in a Round.
- Click on the Settings tab, then select Location.
- Click on Location Manager.
Turning an Existing Location into a Checkpoint
Watch the Video Tutorial:
If the exact location you wish to use as a Security Checkpoint is already in TheWorxHub, you simply need to tell the system it will also serve as a Checkpoint.
- Use the Location tree to navigate to the Location you need, then hover your mouse over the Location name.
- Click on the magnifying glass icon to open the Location Info page.
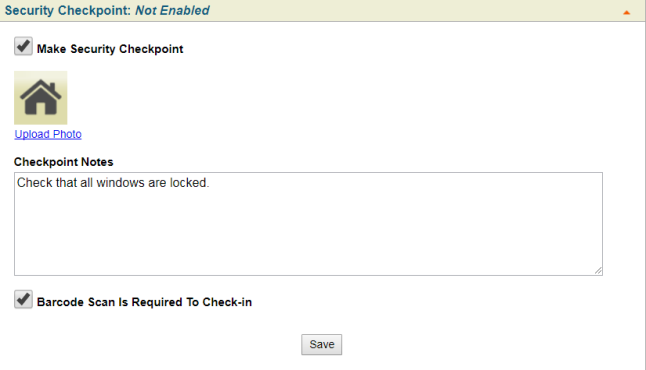
- Click on the Security panel to open it.
- Check the box next to Make Security Checkpoint.
- Click the Upload Photo link to include a photo of the checkpoint in the Security Round.
- In the Checkpoint Notes field, enter any specific instructions you want included for the Security Round.
- If you would like the person completing the Security Round to be required to scan the location barcode in order to complete this checkpoint, check the box next to Barcode Scan Is Required To Check-In. See the Barcoding section below for more information. *Note: In order for the user to check in with a barcode, they must use the pic2shop or Camera scanning option on the mobile version of their device.
- If you do not want to require a barcode scan to check in, the user will be able to check in with a button on their mobile device.
- Click Save.
Adding a New Location/Checkpoint
In some cases, the broader location may already be in the system, but the specific Security Checkpoint is not yet setup as a Location. In this case, you will add the Checkpoint as a Child Location.
- Hover your mouse over the Parent Location in the Location Manager tree, then click the plus sign.
- In the New Location window, enter the Location Name.
- Select a Type and Care Level for this Location.
- Enter any other applicable information, then click Save.
- After you save, hover your mouse over the Location name and click the magnifying glass icon to open the Location Info page.
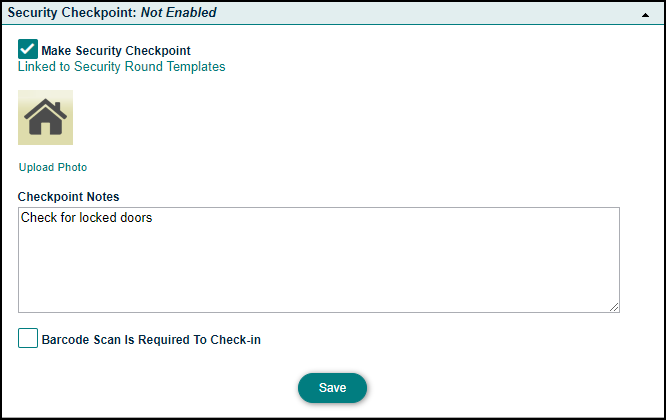
- Click on the Security panel to open it.
- Check the box next to Make Security Checkpoint.
- Click the Upload Photo link to include a photo of the checkpoint in the Security Round.
- In the Checkpoint Notes field, enter any specific instructions you want included for the Security Round.
- If you would like the person completing the Security Round to be required to scan the location barcode in order to complete this checkpoint, check the box next to Barcode Scan Is Required To Check-In. See the Barcoding section below for more information. *Note: In order for the user to check in with a barcode, they must use the pic2shop or Camera scanning option on the mobile version of their device.
- If you do not want to require a barcode scan to check in, the user will be able to check in with a button on their mobile device.
- Click Save.
Barcoding
If you choose to require a barcode scan to check in to a security checkpoint, you will need to create and print barcodes for those checkpoints if they do not already have a barcode posted.
- Click on the Actions tab, then select Barcoding.
- Click on Locations. If there are any locations that do not have barcodes assigned to them, click the Generate Barcodes button.
- Click on the Security Checkpoints link.
![]()
- A pop up window will appear with the security checkpoints listed. Check them off as needed, then click Select Security Checkpoints.
- Select your label template, and click Print Labels. For more information about barcoding in TheWorxHub, click here.
